Friday, April 13, 2012

It's a Boy!!

Yes we are expecting a new Grandson in June!! We now have 4 Grandaughters and one Grandson so of course we were hoping for another boy.  Our little Bryson really needs a playmate so we anxiously await the arrival of Lincoln!!
Since there are several great challenges going on I thought it would be a great time to make my card welcoming Lincoln.
Materials Used
  • Paper - It all came from the DCWV Baby pack with the exception of the dark blue which is also DCWV
  • Cricut Cuts - A Childs Year- New Arrival- and Wrap it Up
  • Stamps - Peachy Keen PK450- Wide Eyed Kids, and My Creative Time-Gift Card Sentiments
  • Bling- Silver Stickles and Want 2 Scrap Baby Bling
  • Action Wobble
  • Inside sentiment is computer generated
I know you can't tell from the photo but I added the Action Wobble to the baby on the inside of the card to make it move as he crawls, he's so cute. I really like dressing up the inside as well as the outside I'm really glad I did the challenges, I probably wouldn't had added so much on the inside otherwise and I'm really happy how it turned out.

Challenges:

My Craft Spot --Challenge #51 Inside and Out
More Than Favors-- Baby Theme
Peachy Keen Stamps  -- Anything Goes
Just a little note, Peachy Keen is having a SALE right now (April13-15) 20% off and they have some new faces, soooo cute, so you better hurry over!!

I hope I have inspired you to join in on the challenges and have a little fun, thanks for stopping by!

Cindylu

Wednesday, April 11, 2012

Heart 2 Heart Sketch Challenge

There's a great Sketch challenge going on at Heart 2 Heart this month and the design team has done an awesome job on their  interpretations!  Above is my card I am entering into the challenge.  This is my first time creating my own landscape for my cute little silhouette stamped image.
To create the landscape I started with a small circle punch and placed it on my paper, them began the blending process.  For my first attempt I am quite pleased with the result. 
Here is the sketch, come on and jump in the fun at Heart 2 Heart!!

Materials Used
Paper used- CTMH Pemberly Collection
Inks-Tim Holts Distressed - Wild Honey
CTMH inks- Goldrush, Olive, Sky, Bamboo, Desert Sand and Indian Corn Blue
Stamps used- CTMH Everyday Life-swing and the sentiment, border under the ribbon is from the Spring collection.
Ribbon-CTMH Seam Binding and Pacifica
Star Embellishment is CTMH chipboard assortment- Lucky

Thanks for stopping by!!
Cindylu


Monday, April 2, 2012

Easter Treat Box


I had so much fun designing my own milk cartons a couple of weeks ago I decided to step it up a little and try to design my own bird house. So I broke out the old score board and went to work.
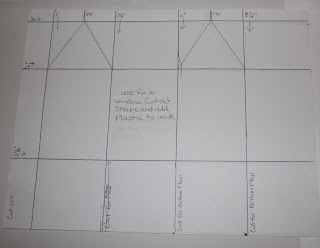
I started with a 81/2 x 11 piece of cardstock. I scored my paper at 1 3/4 intervals (1.75, 3.5, 5.25, 7, 8.75 and 10.5, then rotated the paper and scored at 1 1/2 for the base. I then cut off 3 inches to make it 4" tall without the roof. Here is a picture of the pattern I made.
I used my Spellbinders large and small classic ovals to cut my egg shaped windows and doors. I also used them to make the trim around the windows and door. I added transparency to the inside behind them. Now ad strong adhesive and score and fold. I traced the bottom on a piece of cardstock, cut and applied to inside bottom and on the outside to make it stronger. Punch two holes on opposite sides with hole punch and add a eyelet for your ribbon.
For the roof I used the scallop circle tag on the A Childs Year cart and removed the small circle with my gypsy, cut 1 at 6, 5, 4 and 3 inches. I used a Paper Studio embossing folder, not sure of the name to emboss. Find your center in each circle and punch a small hole. Cut to center, I cut 3 of the scallop shapes on each to make a better cone. I also used foam dots between each roof layer. Run some ribbon thru your eyelets on the house and up thru the center of each roof piece.
Now you can decorate it any way you want. I used my cute little Ducky PKS stamp and made my ducky and cut out some eggs and decorate them. I also used a Fiskar fence punch to trim around the bottom. Other materials used was Glimmer mist on my rosette and some glitter. I used charms and craft wire for my welcome sign. Added a few flowers with Rhinestone centers and some twine around the windows for trim.
I hope you like it, as soon as my daugter eats all the yummies I think I'll hang it up in my craftroom. Will be entering in the following challenges.
Peachy Keen Stamp Challenge - 3D Object - Candy Containers
Ribbon Carousel Challenge Blog- Rcc46 Anything goes
My Craft Spot --#50 Easter
Krafty Girls-- #4 For Peeps Sake!
More Than Favors --#68 Easter/Spring theme
Party Time Tuesday --PTT #61 Anything goes
Double Click AKA Busy Bee--Strolling thru the Park
Come join in the fun and enjoy all the wonderful inspiration. Got to go I have a Ball Game to watch, GO KENTUCKY!!!
Cindylu

Wednesday, March 28, 2012

Heart 2 Heart Technique Challenge

I created this card for the Heart 2 Heart Technique challenge - Embossing. I chose to do both heat and dry embossing, love the effects of all embossing.
For my card I start off by stamping my cardstock with sky blue ink using the "Spring" stamp set that came with my Pemberley add-on from CTMH #C1491 to make my co-ordinating background paper. Then I embossed my white cardstock with an M-bossability folder(ES-005) it closely resembles my flower stamp. I used a MS punch for my center border. Now to the fun part I used my stamp with Versa mark and then heat embossed. I used my copic markers to color in the embossed areas. The sentiment is also heat embossed in gold. The ribbon I found in my stash along with a cute little gold embellishment. Really enjoyed making this card and was pleased with the way it turned out. Come join in the fun at Heart 2 Heart!!

Supplies used:
Cardstock-CTMH- Twilight and Outdoor Denim
Ink for background- CTMH Sky
Sentiment stamp - CTMH Celebration
Image Stamp- CTMH Spring
Embossing- CTMH Gold
Border Punch- Martha Stewart Botanical Scallop
Copic Markers - B04, B00, YG45
Pearls-CTMH Opaque Pearl adhesives
Ribbon and Embelly- my stash unsure

Cindylu

Monday, March 26, 2012

Walking on Sunshine


Good evening everyone, would like to share a card I created for the challenge over at Cooking With Cricut. Challenge #78 Spring Song Inspired Challenge. This week it’s all about those “Spring Themed” Songs. Your challenge is to create a project based on a song that mentions spring or one that reminds you of spring in some way. I chose the song Walking on Sunshine by Katrina & the Waves because spring is time for the NCAA championship and everyone in Kentucky is walking on sunshine!! We have two colleges playing in the final four!! Yeah!! My family is big Kentucky fans so my card had to include the UK basketball player!! GO BIG BLUE!! I used the Everyday Paper Dolls to make my basketball and player. Next I used the Art Philosophy cart to make my sun and tree, I also used the Paper Doll dress up for the fence. I had forgotten how much fun the Paper Doll carts are, they make the cutest little people and our loaded with accessory cuts. I hope you like my card and I encourage you to jump in and join the challenge over at Cooking with Cricut.
Cindylu

Tuesday, March 20, 2012

Easter Treats


Hello my peeps!! Today I wanted to share with you my cute little treat boxes that I designed for my Grandbabies for Easter. I know there are probably some cartridges out there that cut out milk cartons but I decided to do mine the old fashion way.

So I broke out the pen and paper and drew my plan on paper. I used a 8 1/2 x 11 sheet of cardstock and scored at 1 - 3 1/2 - 6 -and 8 ". Then rotate paper and score at 1/2 - 2 1/4 - 7 1/4. You will also need to score on a diagonal at 2 1/4 and
7 1/4 as seen in photo, this will make your milk carton close easily.
Once everything is scored I used a Spellbinder scallop Oval and cut out my window, then add plastic ( I used a piece off a cartridge package) now adhere to inside of carton. Now fold all score lines and assemble with some score tape or heavy duty adhesive.
Now comes the fun part, decorate to taste. I used some PKS for the duckie and the egg, and I used my cricut to cut my bunny and my Art Philosophy cart to create my flowers. I add some twine around the top border punches and to tie off their name tags under the ribbon. Just have fun with it, the receiver will love it any way you decorate it, I'm putting yummy snickers and Cadburry Carmel eggs in them, yum!!
Will be entering these into a following challenges-
Simply Create too -- Challenge #9 Its Spring
Really Reasonable Ribbon -- Challenge #44 Spring with Ribbon
My Sherri Crafts -- Challenge #81 Easter
Celebrate The Occasion -- CTO #55 Welcome Spring
Ribbon Carousel -- RCC #45 Baking with the Twinery
Sweet Stamps -- Challenge #58 Easter
My Craft Spot -- Challenge #49 Spring Scallops
Bitten By the Bug 2 -- Bunny or Chick
Go Fish -- Challenge #13 Easter Project
I encourage you to jump in on the challenges and visit these awesome blogs, they are a great way to get inspired and create something fun!! Have a GREAT day!!
Cindylu

Sunday, March 11, 2012

Simply Crafts March Kite Challenge

Happy Sunday everyone!! I hope you've been having an enjoyable weekend. I managed to get in family time, a ballgame with hubby, some laundry and now craft time.
I've been trying to use up some of my scrap paper and come across the challenge at Simply Crafts and decided to play along. Here are the details for the challenge:

Simply Crafts challenge for March is to make a project, any
kind of project, using the kite cut from the Create a Critter cartridge (it is
on the same key as the giraffe cut). If you don't have that cartridge any kite
cut will do.
Card Recipe
Create A Critter-Clouds and Kite
Art Philosophy -- Sun and bottom border
Embossed kite with Grand Impression Stamp and clear embossing powder
Paper are scraps and probably Core Dinations
clouds and Sun inked with Tim Holtz distress - Wild Honey & Broken China
Sentiment Stamp- Papertry Ink
Well I'm off to make a few birthday cards, I need 4 this month!! Thanks for stopping by and I hope you will come join in the challenge!!
Cindylu

Friday, March 9, 2012

Featured at Crafer's Companion!!


I am over the top excited to see my card was featured on Crafter's Companion Blog this morning!! I am fairly new to coloring but they are having a fantastic prize for their Going Green Challenge this month. Their prize is (3) packages of their awesome Spectrum Noir Alcohol Ink 6 Pen Marker Sets (your choice of color groupings) and a Spectrum Noir 36 Pen Zipper
Bag to store and transport your new markers! Now that would be fantastic since I have only a few markers, this would be awesome to win!! So come join in the fun and maybe you will be the lucky winner of this awesome prize!!
Thank you Crafter's Companion, I am so excited to have been featured!!
Cindylu

Wednesday, March 7, 2012

It's a Green Thing


It's difinetly the time of year for green. After a very dull winter is alway nice to start seeing a little color around and just so happens green is my favorite color. My kids have always asked why green and I tell them that green is the color of money. That is not the reason but they always chuckle.
Here is an Easel card I made for St Patricks Day. I love doing the easel cards so the recipient can display and enjoy them. If you would like to join in the fun just click on the links and enter!!
Scrappy Moms Stamps --Terrific Tuesday Challenge-St Patrick's Day(3-16)
Crazy 4 Challenges -- C4C126 Fun Folds
My Sheri Crafts -- CHALLENGE #80 - Easel cards with a shamrock (3-16)
Thanks for stopping by, happy crafting!!
Cindylu

Friday, March 2, 2012

Kiss me I'm Irish!!


The storms have passed and no damage here, thank you!! Now that the weekend has started lets craft!!

Would like to share a card I made with an adorable stamp set I won over at Crafter's Companion, the Swalk "Love You" stamp set. Isn't is adorable? I tweeked it to use as a Sainty Patty's Day set.
It has little hearts above their lips and I replaced them with shamrocks and made my own sentiment on the computer. The cute sentiment on the inside is the Irish Blessing.

Will be entering this into a couple of challenges, please join in the fun!!
Crafters Companion -- Going Green
My Creative Time -- CRICUT-LESS
Ribbon Carousel --RCC42 Anything Goes
Really Reasonable Ribbon -- #43 Monochromatic Green
Party Time Tuesdays -- #57 Anything Goes
Would like to leave you with a tidbit about an awesome blog and a fantastic giveaway an "IMAGINE", yes you heard me right an Imagine. Bryan over at Scrap Guy's Paper Crafting adventure is giving away an Imagine monday, March 5!! Would appreciate it if you told him Cindylu sent you over. So get over to Scrap Guys and leave a comment!! Thanks for stopping by and I wish a beautiful crafty weekend!!
Cindylu

Wednesday, February 29, 2012

DIY Photo Canvas

Yeah, this is my first attempt at making my own photo canvas!! It's not perfect but not too bad for the first go around.
This is really simple to do. All you need is
1) tissue paper
2) canvas (purchased at Hobby Lobby 2pk 8x10 for $3.49)
3) card stock
4) modge podge
5) black and white photo
6) paint brush
7) tape
First off find a photo you would like to use and crop it to the exact part you want to show on your canvas. Cut some tissue paper to fit over your card stock by about 1/2" and tape down. My photo is an 8x10 and my paper size was 12x12 and centered in the middle of the page. If your printer does not print that large just use a 8x11 and make sure your photo is printed in the center.
Now after you photo is dry remove the tissue paper from the cardstock and trim to fit canvas with a 1/2" overhang on all sides. Apply Modge Podge evenly to your canvas. Center your photo and lay ontop very carefully. With your fingers start in the center and slowly smooth out any wrinkles. Be carefull tissue paper will tear. After you have the top done add some modge podge to the sides and bring down sides and smooth out. Let dry completely.
I added a final coat of modge podge on the top and sides. Let dry completely and ta da, you have a canvas photo.
I am going to try this again with regular copy paper and compare the two to see how that looks. Will keep you posted. If you have any questions just let me know, will try to help. Thanks for stopping by!!
Cindylu

Sunday, February 19, 2012

Winter is for The Birds!!

This is my card I made for the Cardz TV challenge #102 -- A Stitch in Time. Make a card for any occasion using real or faux stitching and use any cartridges or colors you’d like. Since I was feeling a little Blah from cabin fever this is what I came up with. Sorry for the poor picture, not very good lighting.
The cute little penguin is cut from one of my favorite Cricut cartridge-- Create a Critter on page 39. I add some faux stitching around the card base and around the penguins face. The icicles are a Martha Stewart punch, I think it's a Halloween punch but works nicely for icicles as well.
Come join the fun at Cardz TV and thanks for stopping by!!
Cindylu

Friday, February 10, 2012

PTI Sketch Challenge

Todays contest at Papertrey Ink the challenge was to choose a sketch and create a project based on it. I chose sketch #5, I love the simplicity of this sketch.

Unfortunately today was spent preparing to visit the funeral home. A very good friends husband lost his battle with cancer. As I was at the florist I seen this poem that was very fitting so I decided to use it on my card. This is my first sympathy card, I find them very hard to do.

This is the inside with the rest of the poem.
God saw you getting tired,
And a cure was not to be.
So he put his arms around you,
And whispered “Come to me”.
With tearful eyes we watched you,
And saw you pass away.
Although we loved you dearly,
We could not make you stay.
A golden heart stopped beating,
Hard working hands to rest.
God broke our hearts
to prove to us,
He only takes the best.
This is short post, it has been a long day. Good night all.
Cindylu

Thursday, February 9, 2012

Papertrey Ink Celebration Day 5


Already day 5 at Papertrey Inks celebration and they have got so many exciting things going on right now!! Thier Sneak Peaks have been awesome, can't wait to get some!! Today they announced that Papertrey Ink has now created and entire series of Pinterest boards to serve as a fantastic one stop shop for all your inspiration needs!

So todays contest is to pick one of the team members Pinterest inspiration photos or select your own piece of Pinterest eye candy to use as a jump-start for your very own creation. I chose this adorable little bee set, isn't it cute!! You can check it out here.
Materials used:
Paper--Papertrey Ink and Coredinations
Bee-Create a Critter
Spellbinders--Labels S4169 &168
Stamp Sentiment--Papertrey Ink Flower Garden Sentiments
Bee Face --PKS Critter Faces
Stickles
Irock
I just love all these challenges, come join in the fun at Capture the Moment, Nichole will keep you upto date on all the events. That's it for now, ta ta!!
Cindylu

Wednesday, February 8, 2012

PTI Color Challenge

Good evening everyone!! I am having loads of fun celebrating Papertrey Inks 5th Anniversary. They have a lot of great things happening and today they have a color challenge. You were to pick a team members favorite color combination and create a project.
I chose Ashleys
I will say this was a challenge using 5 colors, a little out of my comfort zone, but in the end I am quite pleased with the card. Thanks for stopping by, ta ta for now!!
Cindylu

The "Funky Fold"


Love this fold, It looks more difficult than it is!! There is a great tutorial on how to make it from Sandy at Stars & Stripes. Stars & Stripes is having a virtual card making party and listing a couple of challenges each day. Challenge #3 is the "Funky Fold".
I love learning new techniques and folds. This one came together pretty easy and I love how it turned out. Come join in the fun at Stars & Stripes!!
Material list
Paper- DCWV "Out & About" and color cardstock
Cricut carts- Home Accents and Sentimentals
Stamp Sentiment -- Papertrey Ink "#2071 Pond Life"
Bling -- Want 2 Scrap
Hope everyone has a fabulous day and thanks for stopping by!!
PS -- Don't forget to stop by Scap Guy's and sitn up for his IMAGINE Giveaway, and really appreciate if you told him Cindylu sent you, Thanks!!
Cindylu

Monday, February 6, 2012

Papertrey Ink 5th Anniversary Celebration!!


Today is the second day of Papertrey Ink's Celebration and for today's contest they have a sheet of freebie images that each of the 2012 Stamp Designers has contributed to. Your challenge is to print out the sheet onto white cardstock and incorporate one of the images into a project. With so many amazing images to chose from on the sheet, it may be difficult to pick just one! Well let me tell you they are some fabulous images!!

I chose the sweet little birdie "Just thinking of You". Sorry about the bad lighting in the photo, will have to work on that.

Thanks for stopping by, hope you have a great evening!!

Cindylu

For My One & Only


Hi there!! Today I am sharing a card I made for my Dear Hubby, this will be our 30th Valentines day being married, oh my!!

My daughter In Law made one last week with black and white and I thought it turned out splendidly so I gave it a try, I think I like hers better. Did not want to get to frilly for the hubby so I hope he likes it.

Will be entering it in to a few Fabulous Challenges, here is a list where you can join in the fun!

Paper Playtime Challenge #67 -- Cricut Creations with Hearts or Love Theme
Fantabulous Cricut Challenge #97 -- use a heart on your project
My Creative time Thursday Throwback Challenge -- VALENTINE'S DAY CHALLENGE! Use any cartridge of YOUR choice & just make a Valentine Card
My Craft Spot Challenge #43 -- Valentines Day a card or treat packaging


Materials Used:
Cricut Cart-Elegant cakes pg 31
Paper- DCWV
Sentiment - My Creative Time "Gift Card Sentiments"
Label- Spellbinders S4-235 Fancy Tags

Thanks for stopping by and visiting with me this fabulous Monday!!
PS, don't forget to stop over at Bryan the Scrap Guys and tell him Cindylu2u sent you over, he has some fantastic Giveaways going on and you don't want to miss them!!

Cindylu

Sunday, February 5, 2012

Inspiration

Papertrey Ink is celebrating their 5th Anniversary!! All of their designers have listed their favorite items and shared loads of inspiration. Papertrey Ink will be giving away the entire list of items the design team has chosen, Oh My!!

My card inspiration was taken from a project Erin Lincoln created. Just can't say enough about the wondeful design team projects, they are some very talented ladies!!

Hop on over to Nicoles blog and get in on the fun and fabulous inspiration!! Off to watch the SuperBowl Commercials, hehe!!

Saturday, February 4, 2012

Valentine Treat Box

This is little treat box made from a toilet paper roll. I took my roll and covered it in pink paper using my ATG gun. I then flattened my roll and used my bone folder to go over the edges really well, opened it up and flattened it again going the opposite way, you end up with a square tube. Next I cut the bottom 4 corners 1/2" in and folded them in, I used hot glue for the bottom to make it sturdier. To get the milk carton look I folded in my top, you have to play with it a little bit and then crease it.

Then comes the fun part, decorate however you like and I used the George cart and cut out a heart and used the Mickey and Friends cart to cut out my hands and feet. Well I had to add the adorable Peachy Keen Princess Face (PK-640) then placed a baggy full of kisses inside and sealed it up with hot glue as well.
Well that's my cute little treat box, will be entering it into a few challenges this week at
Cooking With the Cricut -- Challenge #71 Child's Valentine -- you must use the colors red, pink and white.
That's it for now, love to hear what you think!!
Cindylu

Sunday, January 22, 2012

A Challenge Card

I love all the Challenges going on!! I always need a little inspiration to get my mojo on and the challenges seem to do the trick. So a special thank you to all who hold and sponsor all these challenges.

Today I made a cute little card for a couple of challenges. The first being Bitten by The Bug -
Caterpillar from Walk in My Garden. He's a cute little bug and I welded him to my apple from A Childs Year cart using the Cricut Craftroom. This is the base of the card, then I cut out layers and assembled.

I also done the inside to resemble the inside of the apple. This was alot of fun to make. Will also being entering him to the Cricut Craftroom - Welding Challenge. They have a really great prize for the challenge--the Sophie Cricut Cart !!
Come join in on the fun!!

Cindy

Saturday, January 21, 2012

Flower Pot Pocket Card

Good evening everyone!! I have had a fabulous Saturday playing with my Peachy Keen Stamps and my Copic markers. They say practice make perfect but I still need a whole lot of practice.
I made this adorable little card for the Peachy Keen Stamp Challenge 01, Pockets. Create a project with a pocket! Whether it folds, tucks, or hides a treat,pockets are a fun way to add something extra!

I thought this was the perfect opportunity to use my Funny Flowers from PKS. They are the cutest. I am learning a little bit about my copics, I definitely need to invest in some better paper and I could really use a few more markers for shading, will have to save a few more pennies first thow.

I added glossy accents to my flowers and dusted them with glitter, wish I had left them as they were. Glossy accents makes it a little dificult to photograph, the shine was causing a glare.

My pocket holds a little card they can keep as a book mark. It's a two for one. Hope you enjoyed my card and maybe a little inspiration. Come join the challenge over at Peachy Keen Stamps!!
Material List
Paper- DCWV
Stamped Flowers - PK-229 Funny Flowers
Copic Markers
Sentiments - Papertreyink #2082
Prima Flowers
Imaginisce I Rock
Glossy Accents
Martha Stewar Punch
Butterfly Stamp -Studio G
Tim Holtz - Vintage Paper and Wild Honey
Glitter- Ribbon and Pop Dots

Thats it for now! Wishing everyone a fabulous weekend!!

Cindy

Friday, January 20, 2012

Baby It's Cold Outside!!

It's cold here but no snow. Would like to see one good snow fall for the season!! I guess I really should be careful what I wish for. Hope you all are staying warm this winter season. That brings me to a great challenge over at Cooking with Cricut -- Winter Warmies Challenge. Make a card showing how you stay warm in the winter season. Well for me that means staying inside and crafting. I really had fun with this challenge, I even have window panes (my plastic off my cricut cartridges), I knew I would find a use for them. Here is a list of supplies I used for my card:

Paper - Close to My Heart and DCWV
Window cut-Cricut Christmas Cart
Little Girl-Sugar & Spice Cart her faced stamped with PKS640- Princess faces
Sentiment is Close to My Heart
Stickles and ribbon

Come join in on the fun at Cooking with Cricut challenge.

Hope everyone has a fabulous weekend!! Ta ta for now.

Cindy

Thursday, January 19, 2012

Will you Be Mine?

Sorry I've been MIA for awhile lets just say I am on the road to being organized, WOO HOO!!
Now maybe I can play, have missed my crafting.
Today I decided to do my first Valentine. I decided on a window card with my main image coming thru the window. I just used my Spellbinder classic oval die and centered it in my card. Placed the image on the inside of the card.
I am new to Copic markers, have only colored a few items but really enjoy them. I will be entering this into the I Copic Lover challenge #65. The challenge -- Pull out those Copic colors you have been neglecting and use them on your project this week. Well since I'm new to coloring they have all been neglected.
This will be my first entry to Whimsical Designs Challenge "Anything Goes"!! They are full of crafty goodness you should check them out and come play!!
Will also be entering it into the Peachy Keen Linky Party. There is no theme to this challenge, just create anything with your Peachy Keen Stamps! Since I do not have any cute Valentine Stamps I found the cutest little Valentine Coloring image and removed the face and then stamped her with My favorite Peachy Keen Stamp set--PKS 450 Wide Eyed Kids, isn't she cute?
Items used for this card are:
Spell binders S4-110 Classic Ovals
PKS 450- Wide Eyed Kids
Indentz embossing folder
Xmas Red Stickles
Copics - RV13, R81, RV43, Y19, YR68, B00, R01
Sentiment -Kinderstampo- Vintage Love
Cardstock-Paper Studio
So glad to be back in my craftroom, now it's time to do a little organization in here as well. Thanks for stopping by and would love to hear any tips or tricks on coloring with my copics! And if anyone can tell me what type of paper to use with my Copics that would be great, thanks again.
Cindylu